Go to Winery & Distillery section
BREWERIES
To make entries in TTB Tamer we recommend using a Process. (Skip to the end of this article for an explanation on how to make an entry without a process. However, needing to make an entry without a process should be a very rare occurrence.)
A process is a collection of entries that you customize to mimic your typical operations or the workflow of a specific person. You can have as many, or as few, processes as you would like.
For example, you can create a process called Fermentation and then have all of your entries used to record fermentation in that process. Similarly, you can have a Process called packaging, and then have all of your packaging entries under it.
Or, you could create Processes around the workflows of specific people. Perhaps “Rebecca’s Process” would be all of the entries pertaining to sales because Rebecca is in charge of all things sales. And maybe “Paul’s Process” would be a different collection of entries because he oversees the brewhouse.
The way you create and organize your processes are completely custom and up to you.
Creating a Process
To get started creating a process, click on Make Entries in the main navigation bar and then Processes Page.
To create a process click the green circle in the center of the page.
A window showing you all of the available entries you can use in your processes will appear.
You can do several things in this window.
Expand/Collapse categories
Click on the blue icon to expand and collapse the groups of entries to better sort through the options.

Search for Entries
Start typing in the search field to quickly find entries.
Mark Entries as Favorites
Once you’ve located an entry that you’re likely to use often you can mark it as a ‘favorite’ by clicking the star icon. You can then filter the list to show only your favorites by clicking the filter button.

Favorites will also be brought to the top of the list when using the Quick Entry form (more about the quick entry form, below).

Adding Entries and Creating a Process
To add entries to a process simply click the green add icon. You can add multiple entries of the same type if you’d like.
To get a feel of all of the possible entries you could make in TTB Tamer, please see the article titled Entry Descriptions.
For this example, let’s say we’re creating a Sales process. We’ll add a total of 4 sales entries. Two entries for kegs sold to the tavern and two for kegs removed for distribution. When you’re done adding entries click the yellow save icon in the upper right.

This will put you in “Edit Mode” where you can create and customize your process. First, we’ll give the process a name and edit the Sales heading.
In our brewery our keg sizes are half barrels and sixtels. So let’s edit the units for these entries so that we don’t have to select the units in the future.
Lastly, I’d like to see our ‘removed for distribution’ entries above the ‘sales to tavern’ entries, so let’s rearrange them. When finished, click the blue Save Process button to save your process.
Sharing a Process with Multiple Users
If you have multiple users connected to your account you can choose to share a process that you’ve created with them or, if you prefer, keep it to yourself.
To share the process click the toggle switch next to the text that says ‘Keep Private to You’. The text will then change to ‘Share with your Brewery’ to let you know that it will be shared.

Using the Process to Make Entries
To use the new process right away creating and saving it, switch it into ‘Use Mode’.
To use the process at a later date click in the search bar on the Processes page and a list of all of your saved processes will appear. Start typing in the search bar to search for a particular process.
Fill out the fields of the entries that you want to make. Required information for all entry types is Amount and Target Date. Additional required information for Losses, Shortages, and Overages is an additional explanation to be entered in the text field that appears above the comments field.
To use a batch number, click where it says ‘Pick a batch’ and either choose an existing batch or enter in a new batch name to be used.
Optional comments about the entry can be entered in the comment text field.

You can use the fields above the entries where it says “apply to all entries” to apply a batch number and/or target date to all of the entries in the process to save time.
When finished, click the blue save icon. A pop up screen will appear showing you the entries you’ve saved.
Making Entries using the Quick Entry dialog
There may be very occasional times when you need to make an entry and you don’t have a process already set up for it. You may not want to create an entire process for it because it’s a very special circumstance.
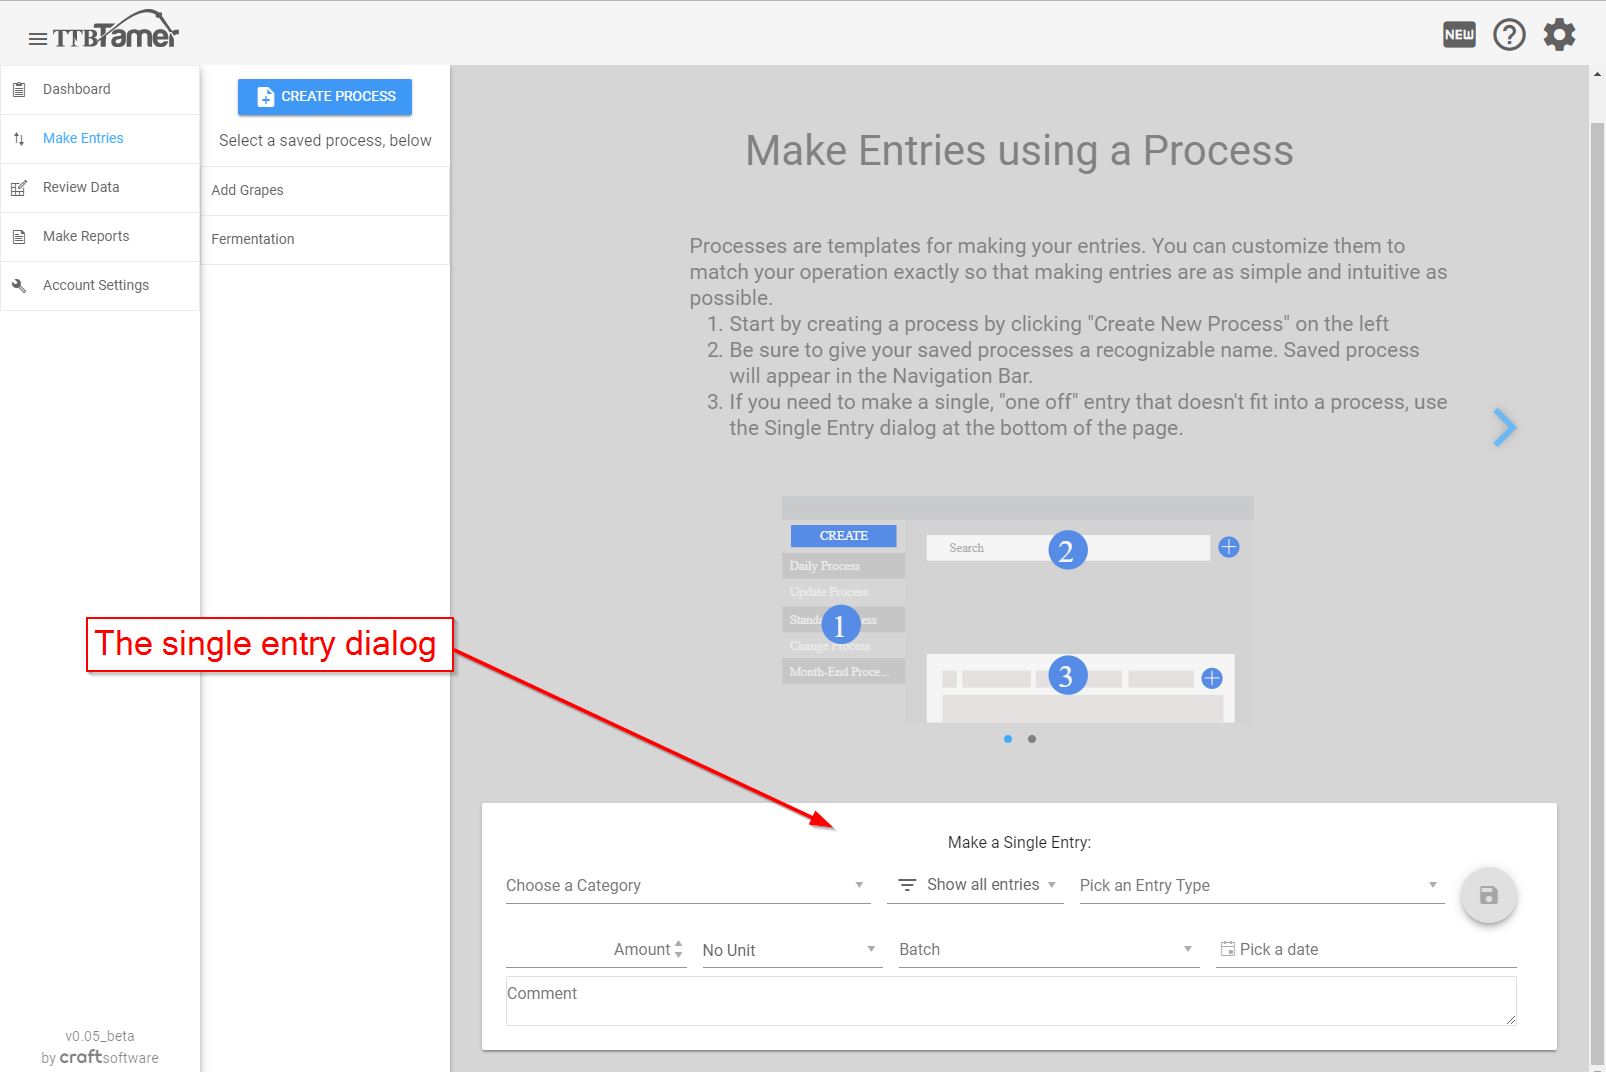
In these cases you can make an entry using the Single Entry dialog located at the bottom of the Processes screen.
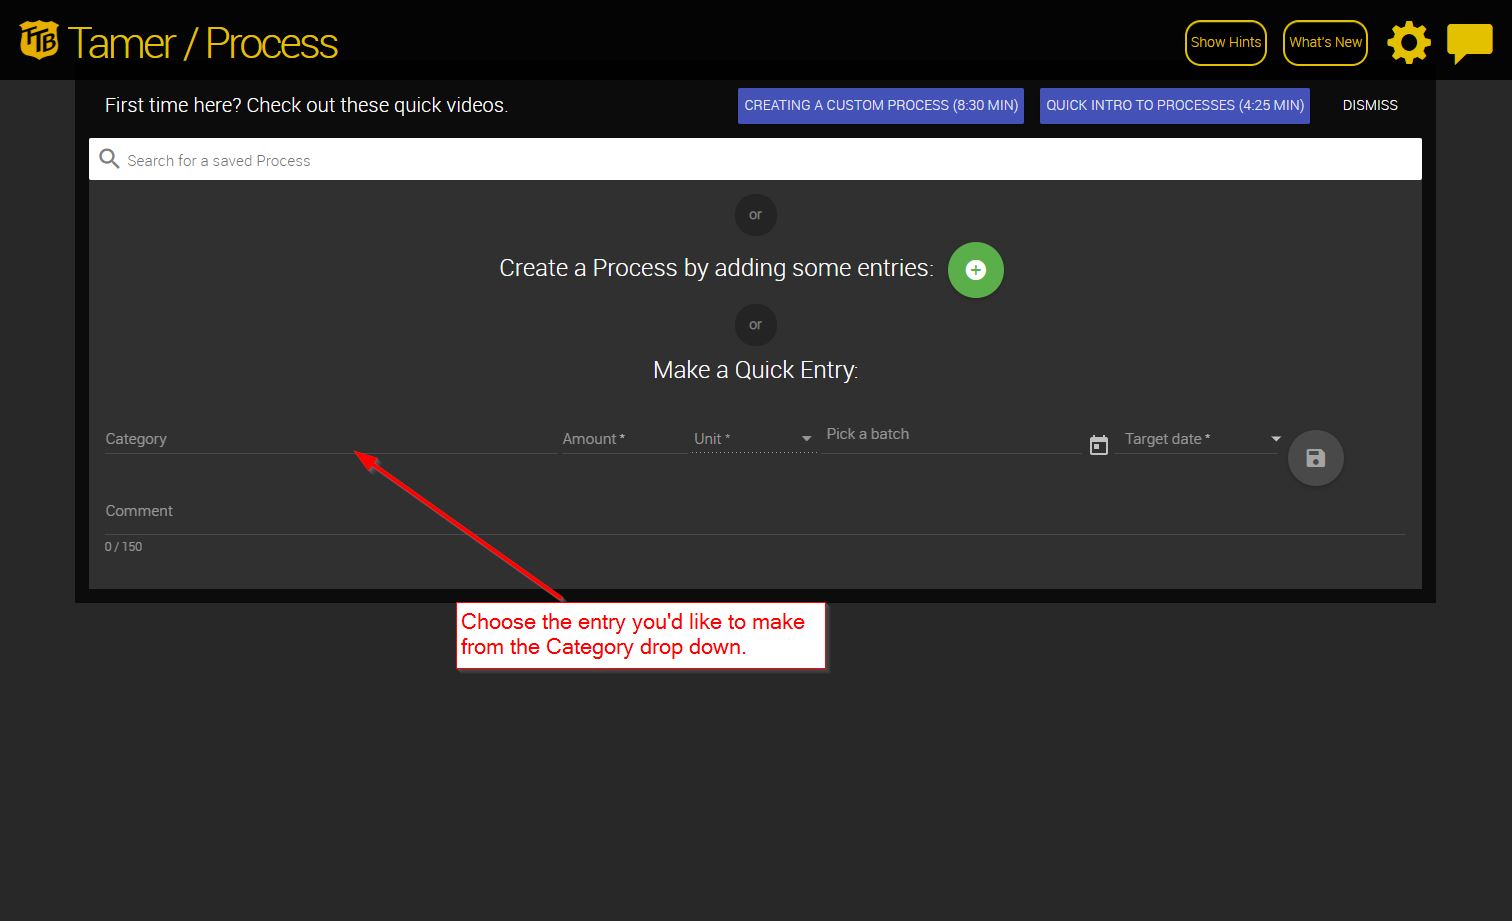
Once you’ve selected the entry you’d like to make from the Category drop down, fill in the remaining fields then click the blue save icon.
Go to Winery & Distillery section
WINERIES & DISTILLERIES
Note: examples given below are winery specific, however the process for making a Process is the same for Distilleries.
To make entries in TTB Tamer we recommend using a Process. (Skip to the end of this article for an explanation on how to make an entry without a process. However, needing to make an entry without a process should be a very rare occurrence.)
A process is a collection of entries that you customize to mimic your typical operations or the workflow of a specific person. You can have as many, or as few, processes as you would like.
For example, you can create a process called Fermentation and then have all of your entries used to record fermentation in that process. Similarly, you can have a Process called packaging, and then have all of your packaging entries under it.
Or, you could create Processes around the workflows of specific people. Perhaps “Rebecca’s Process” would be all of the entries pertaining to hard cider because Rebecca is in charge of all things cider. And maybe “Paul’s Process” would be a different collection of entries because he oversees everything regarding sparkling wine.
The way you create and organize your processes are completely custom and up to you.
Creating a Process
To get started creating a process, click on Make Entries in the main navigation bar, and then Create Process in the secondary bar. This will put you in “Edit Mode” where you can create and customize your process.
There are three steps to create a process:
- Give your process a name where it says “Enter a Process Name”.
- Create your groups and give them each descriptive names.
- Use the drop-downs to add specific Entries to your groups.

You can configure the details of each entry as much as you would like, even down to their optional comments. The idea here is to make the process as custom as you would like so that making entries is simple. However, you don’t want to overly customize the process so much that it becomes cumbersome to use. It may take some trial and error to strike this balance.
Finding the Entries you need
We’ve categorized the entries in TTB Tamer to make finding what you’re looking for as easy as possible.
The first drop-down menu for any entry is to select a wine or material category. All of the different categories of bulk and bottled wine as well as all of the different types of materials that could be used in the production of wine are listed under this drop-down.

The first step is choosing the category of the entry you want to make. For example, you would choose “Bulk – Over 16 to 21 Percent” if you were fermenting an 18% abv wine. Or, you would choose “Bottled – Hard Cider” if you wanted to enter that you bottled hard cider. Similarly, “Materials, Grapes (field crushed)” if you were entering that you used field crushed grapes in your production.
The second drop-down will filter the entries further by letting you choose whether the entry you are making will Increase or Decrease inventory.

The default state of this drop-down is “Show all entries” but the second step we recommend is choosing Increase or Decrease in order to further filter down the available entries.
Lastly, the third drop-down is where you select the entry you want to make.

The types of entries available in this third drop down depend on the selection from the first step (choosing a category) and the second step (determining if the entry will decrease or increase inventory).
To get a feel of all of the possible entries you could make in TTB Tamer, please see the article titled Entry Descriptions.
Organizing Groups and Entries
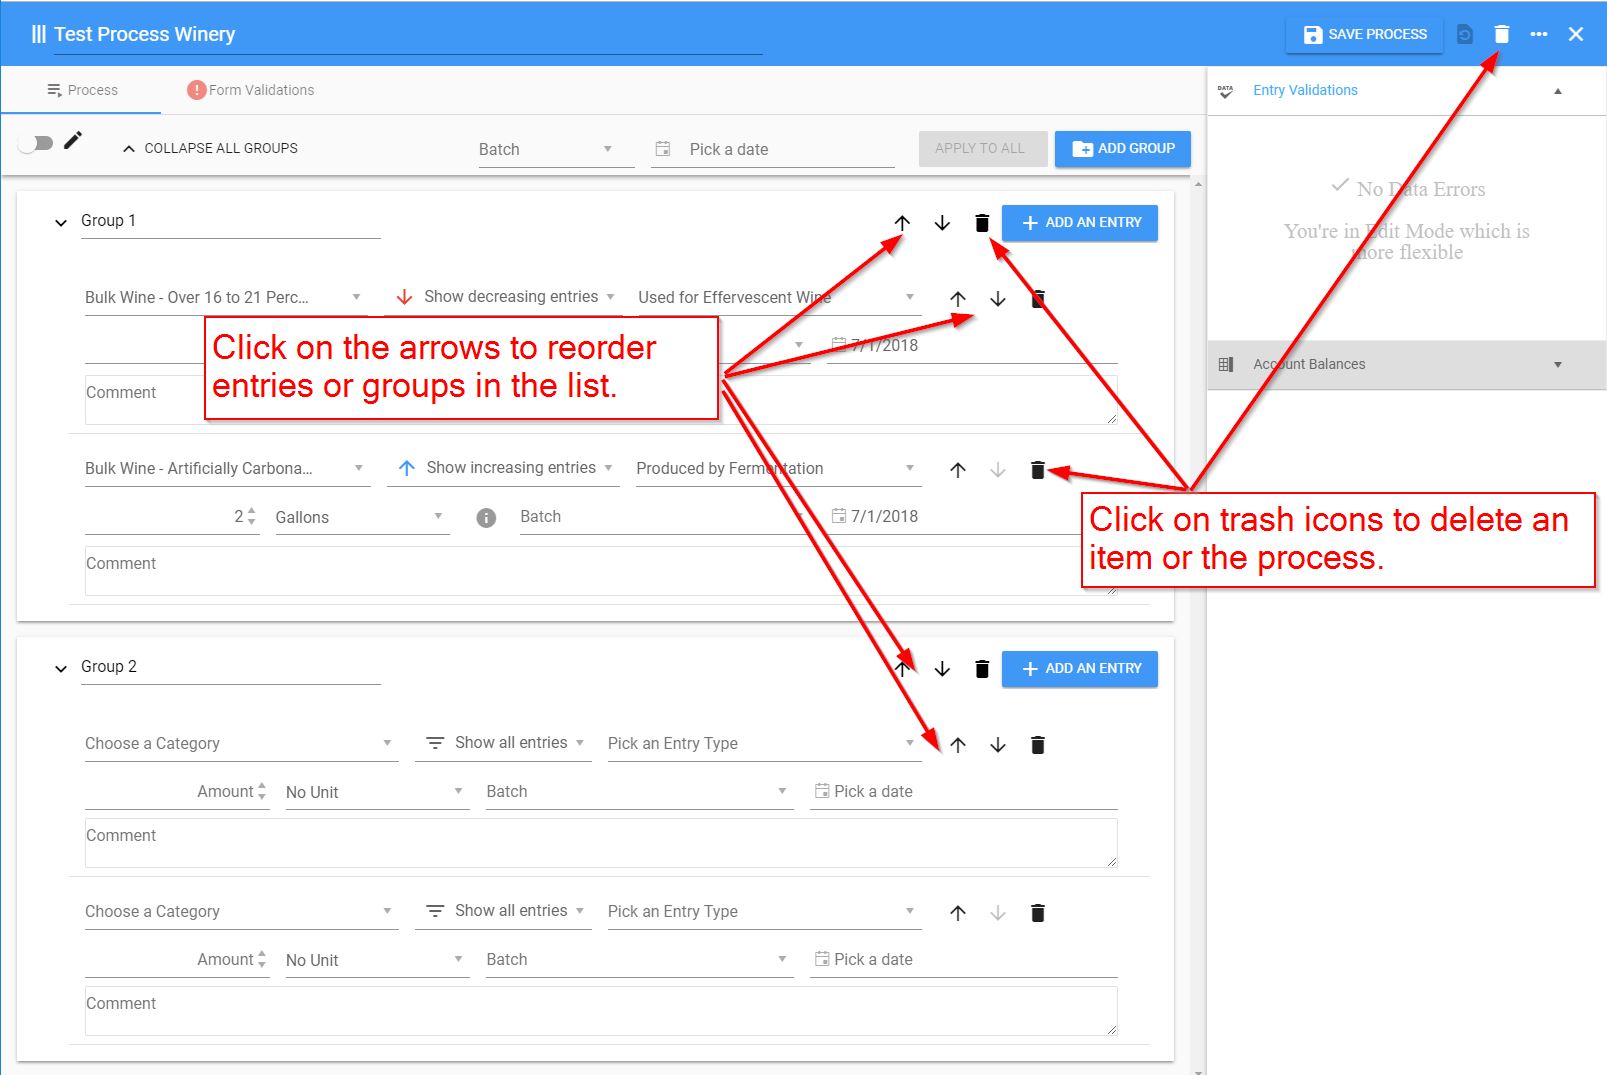
You can reorder the groups and entries by clicking on the up or down arrows.
Click the trash can icon to delete entries or groups.
Making a Process – Example
Now that we know how to find the entries we’re looking for let’s looks at an example of making a process.
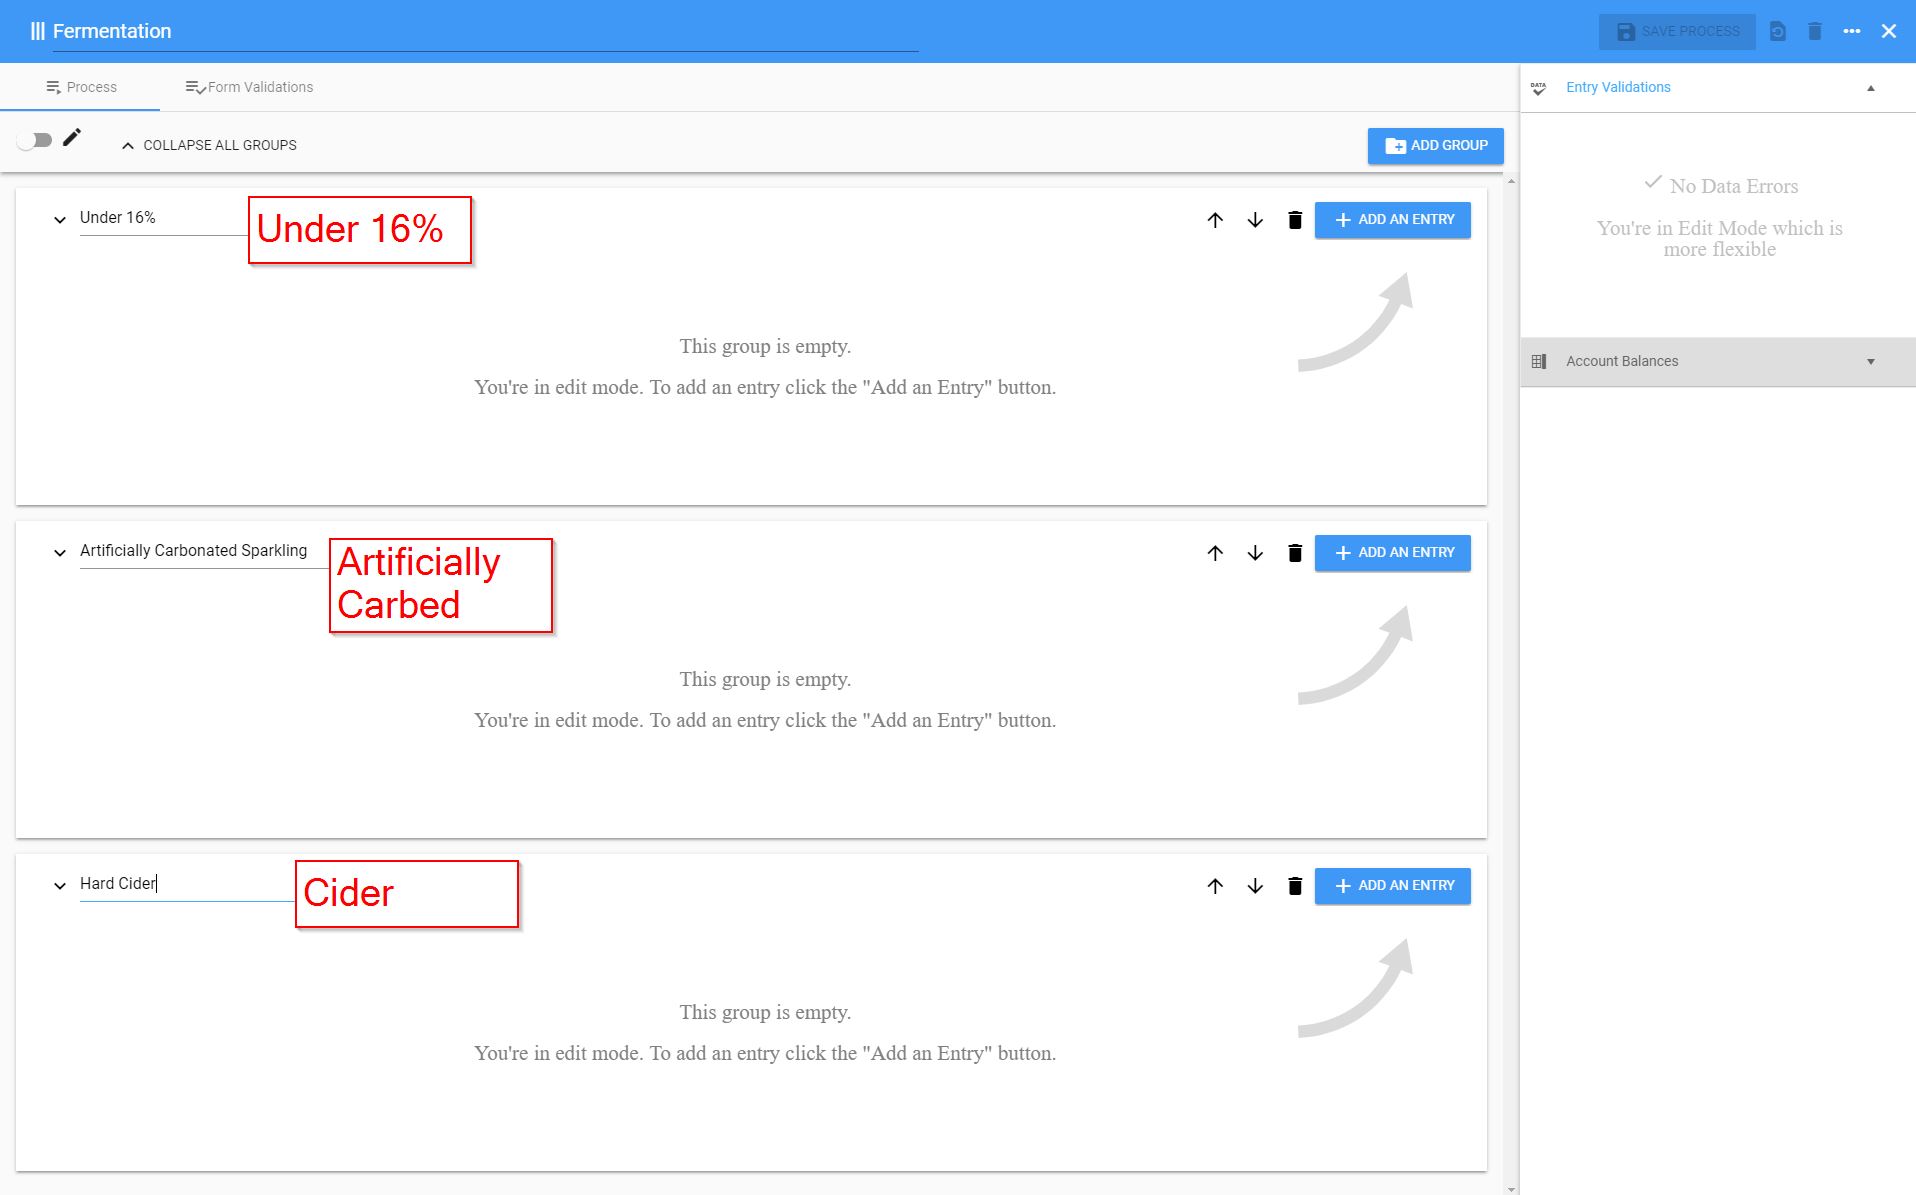
Our example winery produces 3 main types of wine: Under 16% abv wine, Artificially Carbonated wine, and Hard Cider.
Let’s create a process called Fermentation with three separate groups, one for each type of wine.
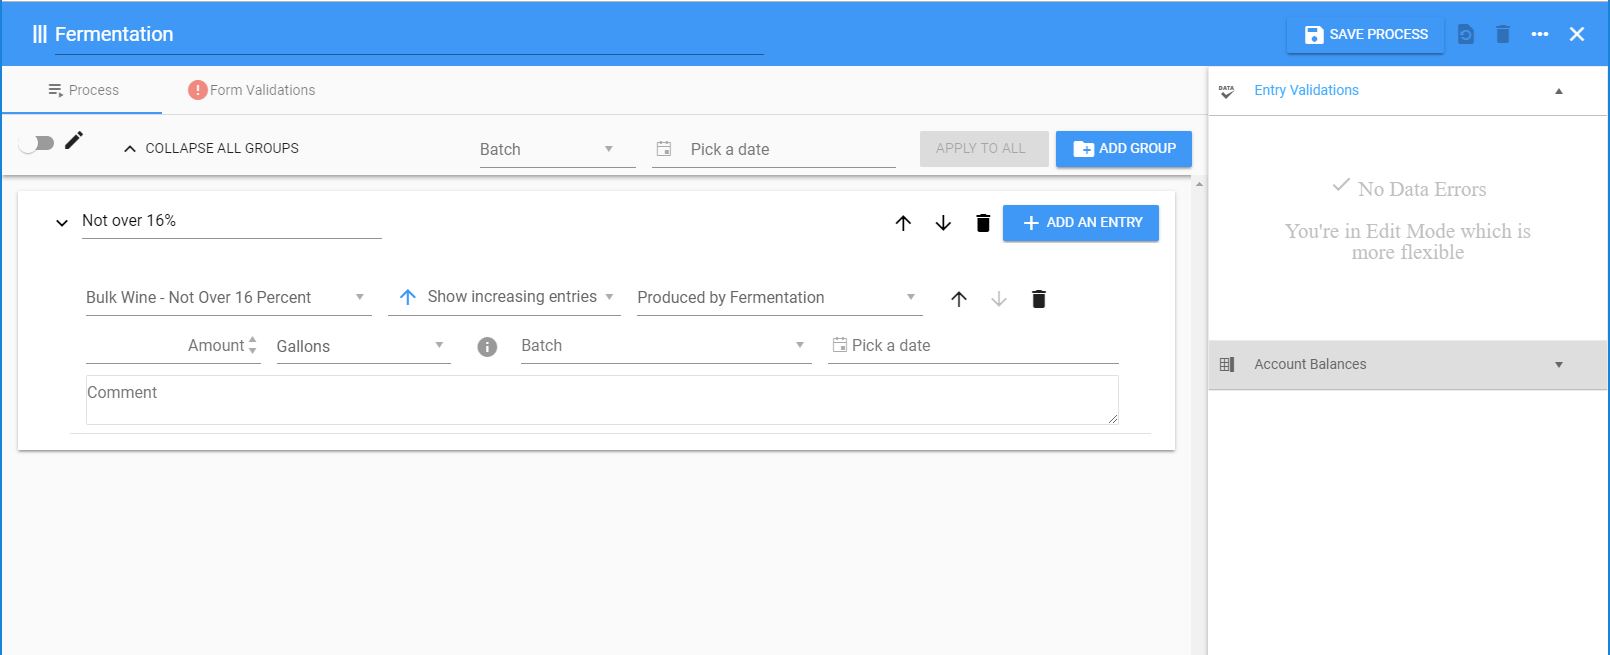
Next, I’ll start adding entries under each type of wine. Here’s what the entries in the “Under 16%” group would look like (click on the image to make it larger).
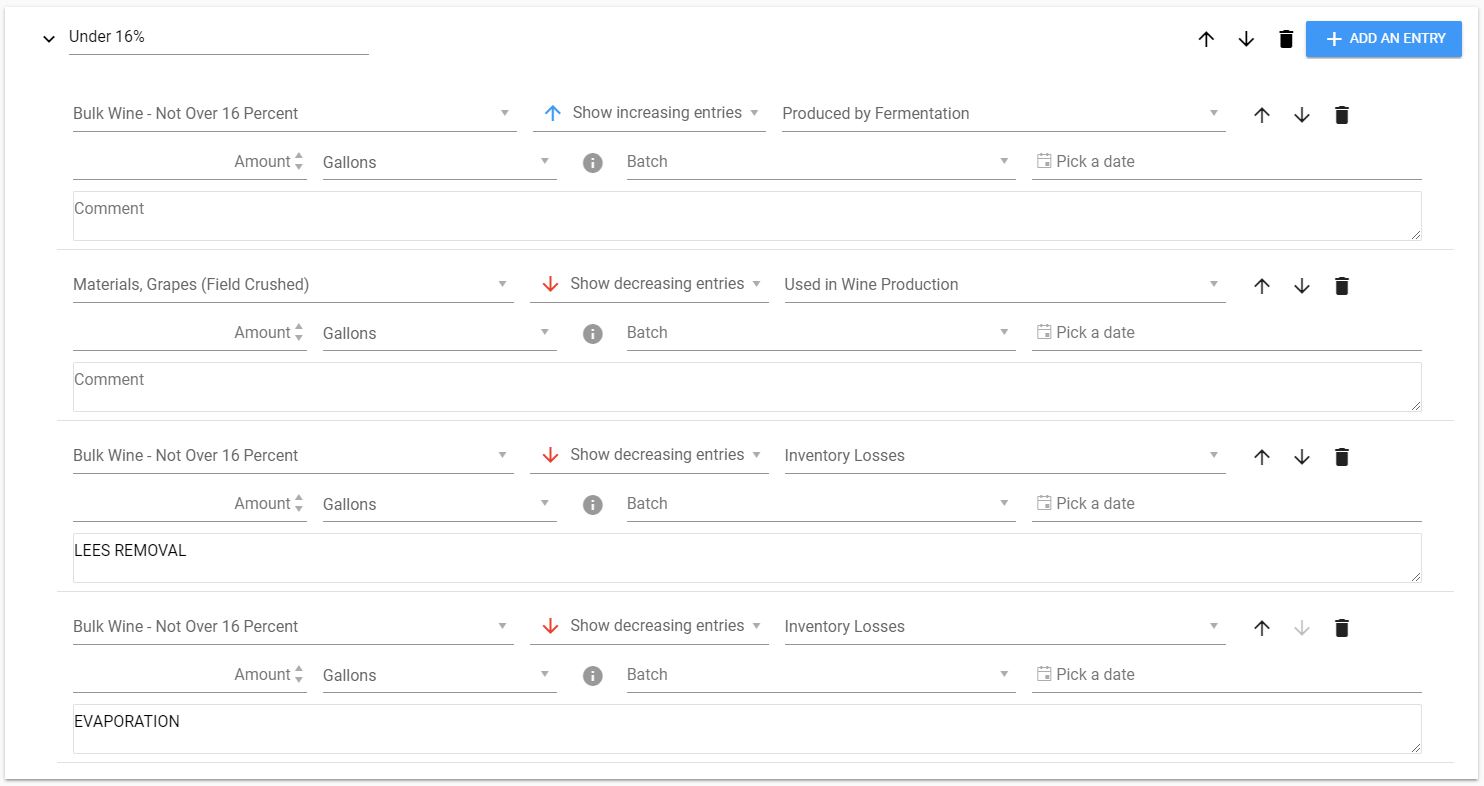
You can see the entries I have in this group are:
- Produced by Fermentation
- (Field Crushed Grapes) Used in Wine Production
- Inventory Losses with a comment of LEES Removal
- Inventory Losses with a comment of Evaporation
You can also see that I’ve decided to fill out two of the comment fields so I don’t have to remember to fill them out when I upload the entry: Lees Removal and Evaporation. This will allow me to make these loss entries more quickly without forgetting the comment.
For now, I’ll leave the entries for Artificially Carbonated wine and Hard Cider blank. To save the process I’ll click on the Save Process button in the upper right.
The process is now saved for later use.
Form Validations for Processes
We’ve included a significant amount of built-in form validation that is active when you make processes and entries. An easy example of this is that you should include Materials Used when you make an entry Produced by Fermentation.
To visit the Form Validation part of TTB Tamer, click on the Form Validations tab under the name of your process.
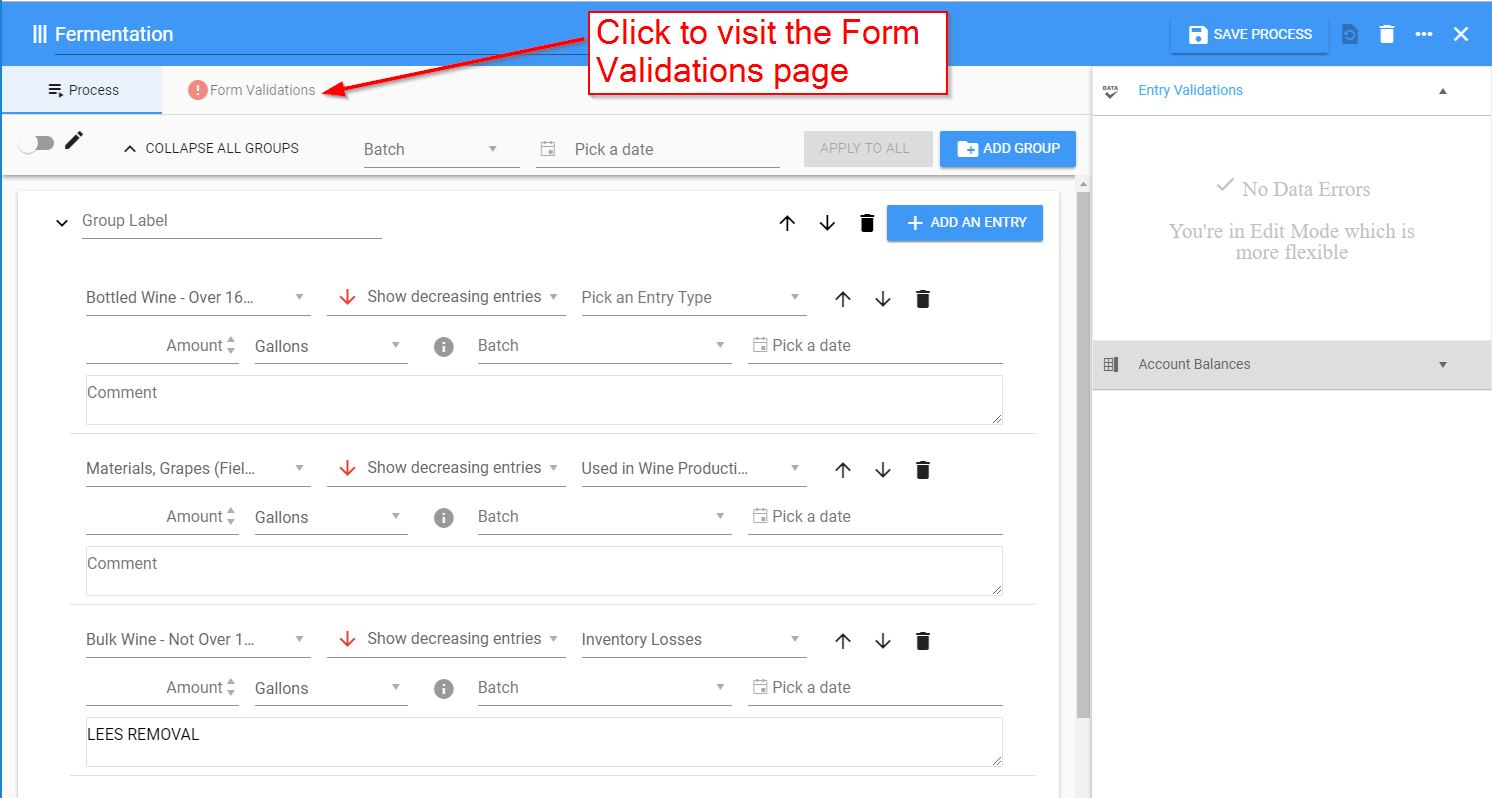
You’ll notice that there will be a red exclamation point if there is something on this page that you should be aware of.
Taking the example above, any time I have an entry of Produced by Fermentation I should also have a corresponding entry of Materials Used. This is what the page looks like if I forget to add Materials Used to my process.
What my process looks like (click to expand)
What my Form Validations look like (click to expand)
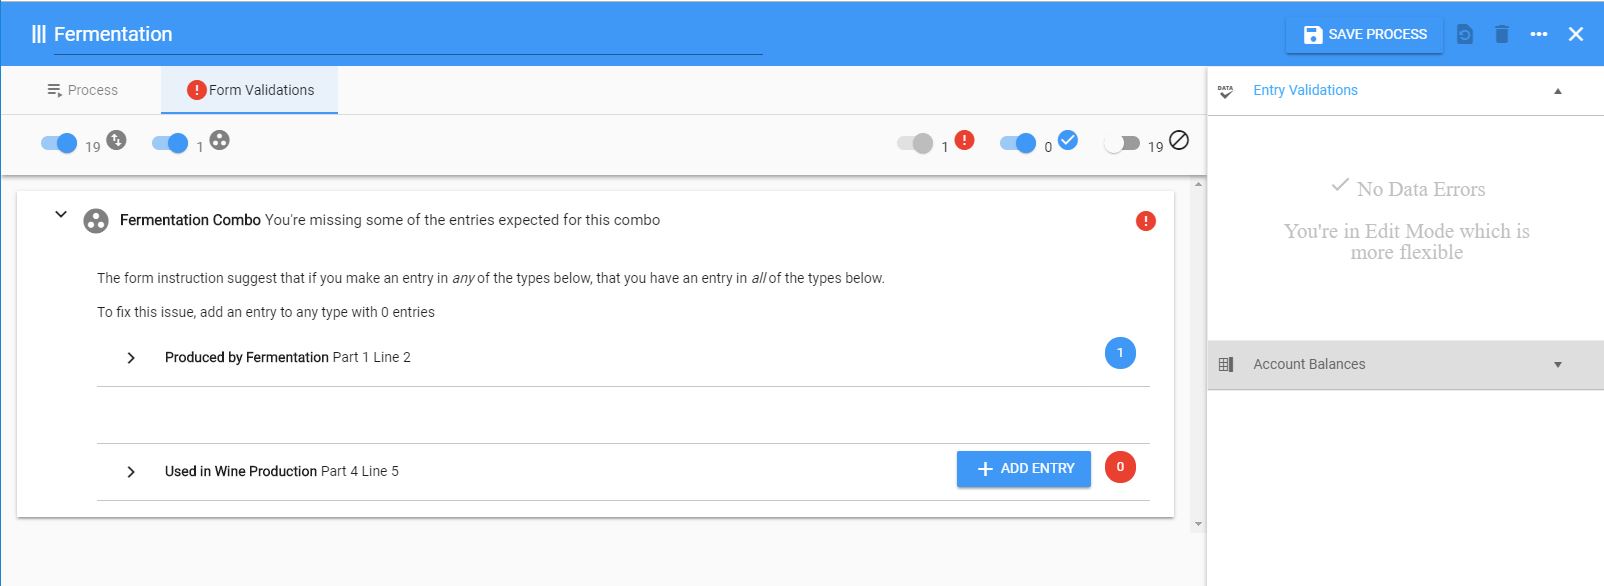
In short, the app is expecting to see a Used in Wine Production entry when it sees a Produced by Fermentation entry. To fix the problem, simply add a Used in Wine Production entry to the process. You can do this either on the process page or the form validation page.
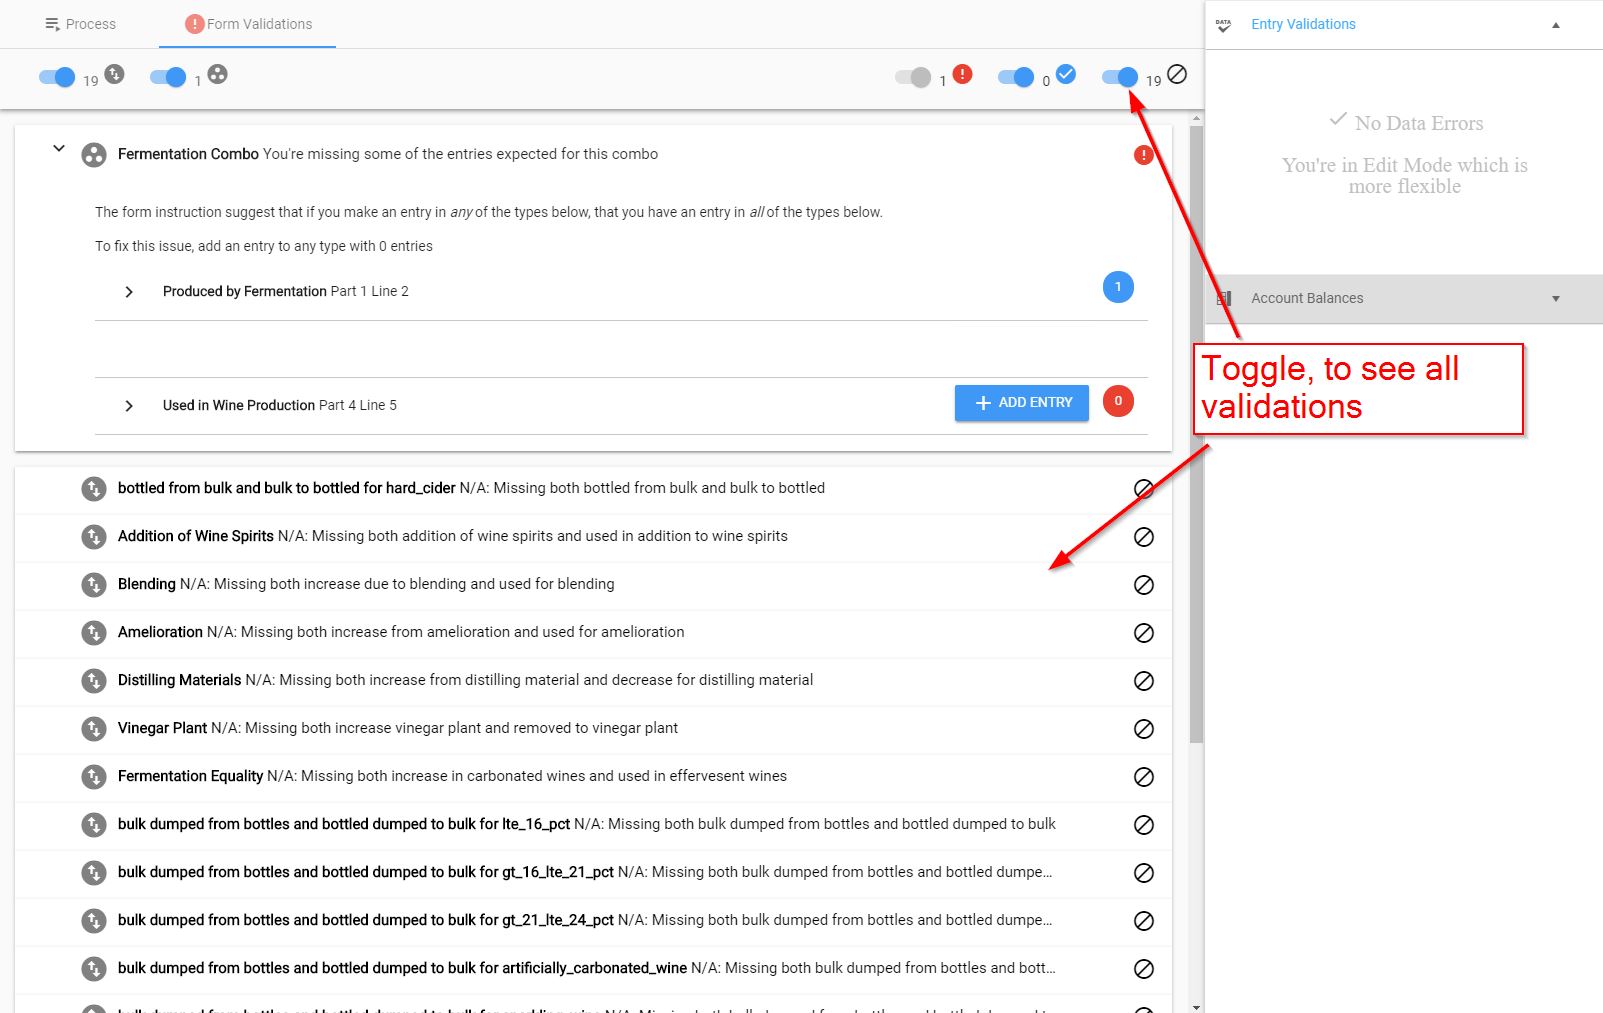
To see a list of all the validations the software will look for, toggle the Ø sign in the upper right corner.
Making Entries using your Process
Once you have a saved process, to use it simply click on its name from the Make Entries navigation bar.
Or, if you just finished creating the process, simply toggle the process to “Use Mode” to use it.
Fill out the remaining entry fields of the entry that you want to make. Take note of the Entry Validations on the right side of the screen to make sure that your entry is not missing any information (for example, target dates and amounts are required pieces of information).
Also, you can expand the Account Balances section on the right side of the screen to get a visual representation of the changes that will be made when you upload your changes and how they will affect your inventory balances.
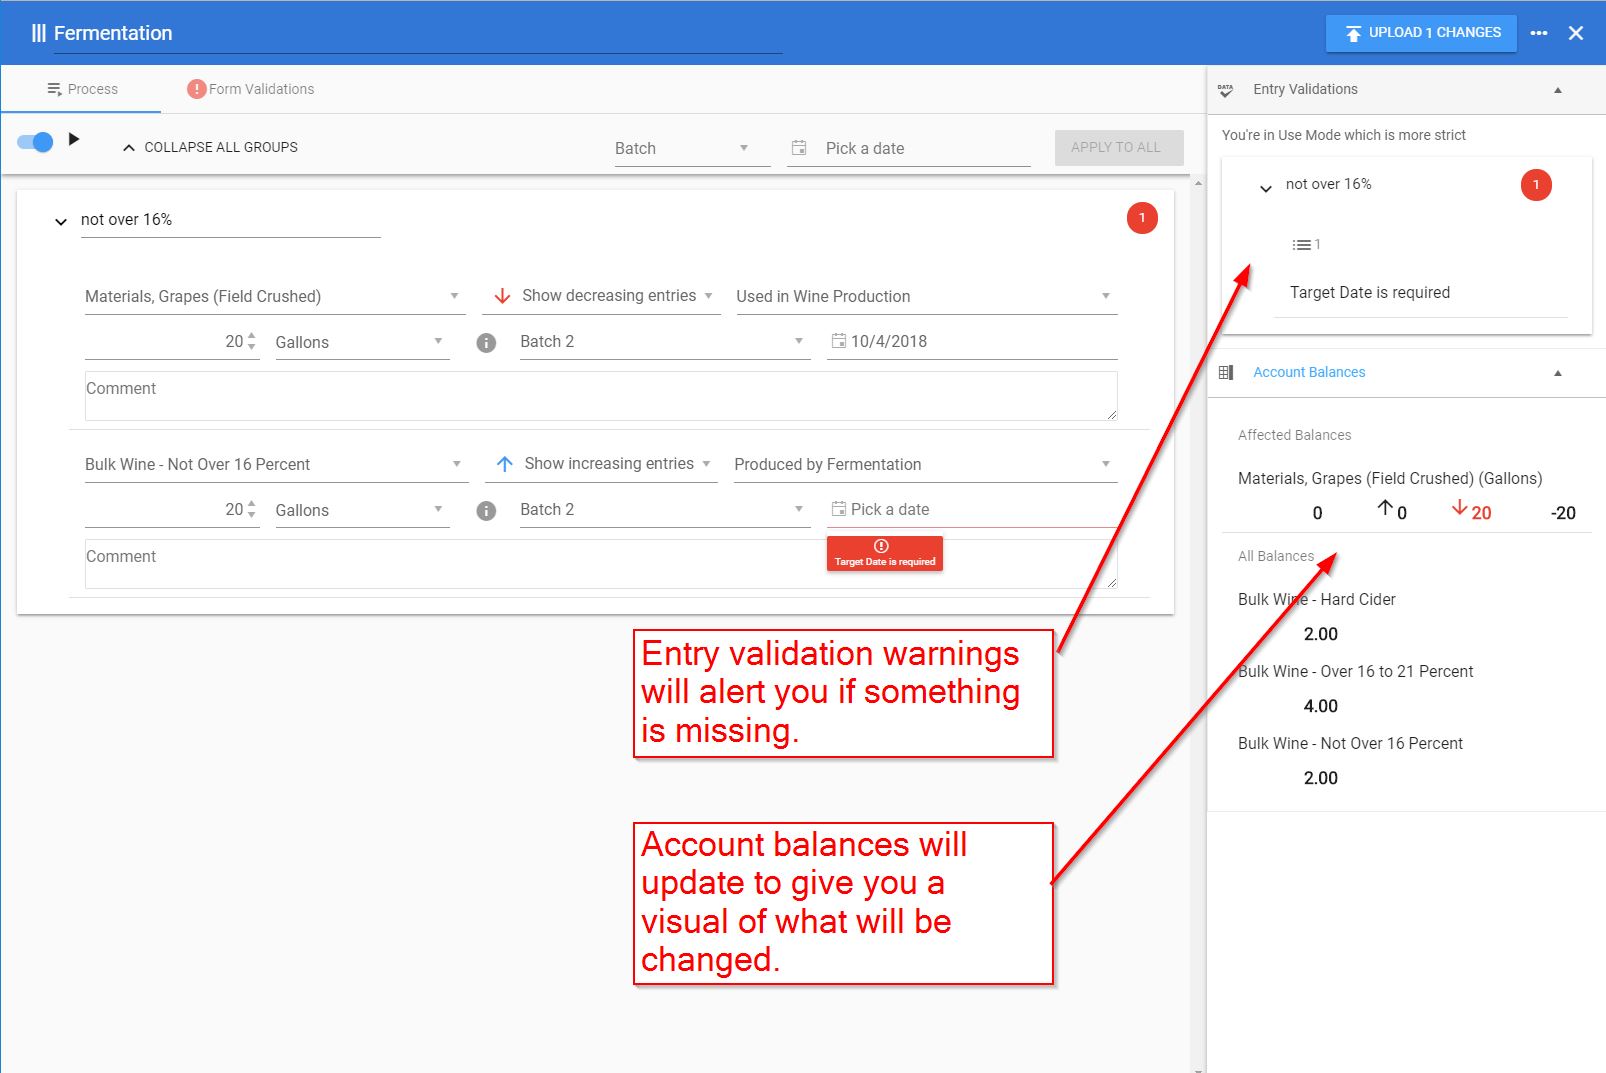
After you’re satisfied with the information you entered, click Upload Changes in the upper right corner of the screen. A confirmation dialog will appear. You’ll be asked to confirm that the entries look correct before they’re saved to the database. Review the confirmation dialog to make sure you’ve made all of the entries you needed to.
If you didn’t catch all of the validation issues (like the picture shown above) you won’t be able to save your entries. Simply click cancel, fix the validation issues, and then try to re-upload your changes.
If you have no validation issues you’ll be able to acknowledge all of the changes in the confirmation dialog and click Upload to save your entries.

Making Entries using the Single Entry dialog
There may be very occasional times when you need to make an entry and you don’t have a process already set up for it, and you may not want to create an entire process for it because it’s a very special circumstance.
In these cases you can make an entry using the Single Entry dialog located at the bottom of the Make Entries screen.
Please note that form and entry validations are not performed when you use the Single Entry dialog, so incorrect entries can be made quite easily. We recommend using Processes as much as possible to take advantage of the built-in validation features.